Home
Graphics
Fun With Links
Before we begin this guide assumes you already know how to create an
HTML document as well as the basics of CSS. If you don't already know
how to do that or need a refresher please click this linkHow To Build a Basic Webpage before going
any further.
Setting Up a Page To Link To
If you have more than one html document then there is a good chance you
want your user to be able to get to the other page without having to type in
the exact url in the search bar. Good news is the link system is here to
help. To get started you first need to set up another html document. Save
that document and go back to the html document you want your link to go.
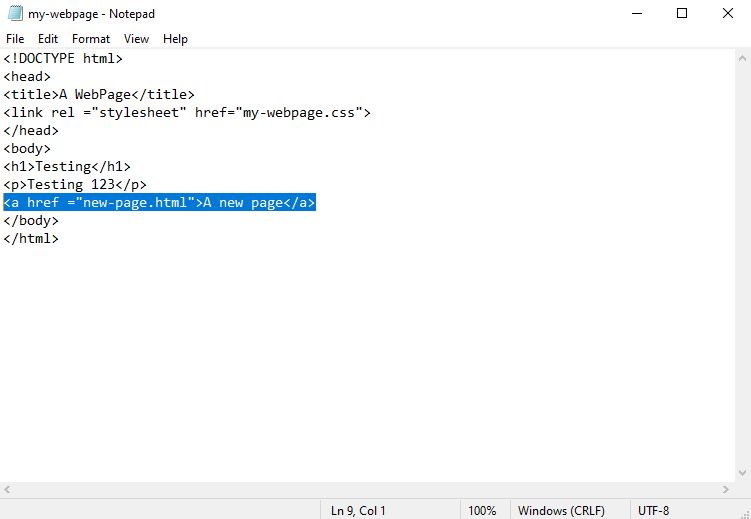
On that page type in < a href ="Yourlink.html" > and before you put the closing
tag up < /a > type in the name of the link you want your user to see. Remember
that the text in the " " is the actual link itself where as the text past the > is
what the user will see as such the text past the > can be anything you want it to
be. Another caviot is that while yes you can simply get a way with just typing in
the name of the html document within the " " it will only work if both html documents
are in the same folder. This concept is not just limited to your files either as you
can easily link over to a completely different website by just coping the url from
the search bar in place of Yourlink.html. Just make sure you put the close tag up
< /a > before adding more text otherwise it will just become part of the link you
have set up.

While this will work maybe you want to change the look to make it
more readable.
Changing the look of the link
The important thing to remember here is that unlike the body
section of the CSS document there are different types of link styles.
For now we will just focus on visited and unvisited links. I must say this right now
do not add the following to the body{ } of the CSS document as this deals with
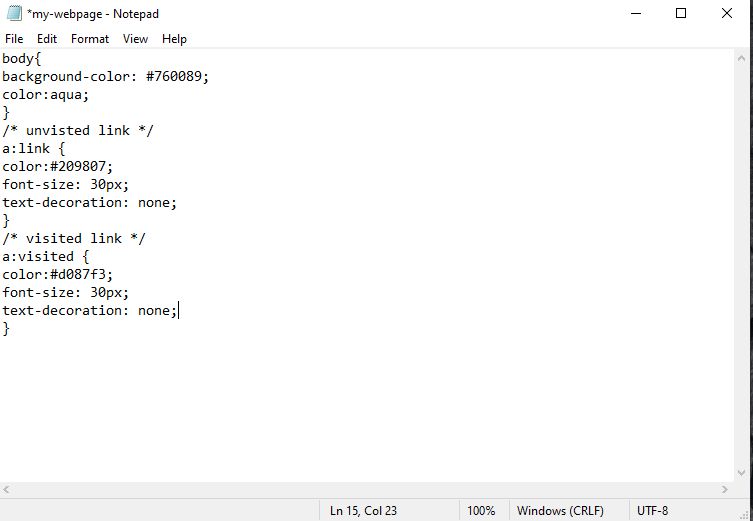
a completely different section of the document. To start with the unvisited link
type in a:link { } and within the { } you can do stuff such as change the color
of the link. The command for this the same as the used for text color. You can
also change the font size by typing in font-size: #px; the # in this case is replaced
with the number you want for example font-size: 30px; px of course stands for
pixles. This concept will also work anywhere text will go such as h1, h2, p, etc.
If you saved your page and looked at the link you may have noticed that there is
an underline on the link. You may or maynot want this depending on how you plan on
setting up the website so in order to remove this you want to type in
text-decoration: none; to the CSS. Now to do all this to a visited link
just type in a:visited{ } outside of a:link { }. The diference being that for
an unvisited link you type link past the : and for a visited link you type
visited past the : other than that the options are the same. Now just save your
changes and if you did everything correctly you should notice the link looking
different than it did before. As a tip if you can't see the unvisited CSS for the link
try clearing up the search history as doing so as long as there is no further refrence to
that page will reset the link tricking it into thinking you have not already been there.

Closing Thoughts
Being able to link pages together is a very important step to setting up
a website as doing so gives you the abillity to access multiple pages on a given
website. Once again if you wish to know more about web design click this
link to W3schools W3schools
Soon enough I will teach you more about web design.